Embarking on a project like how to install a composite fence can feel daunting at first. But, let me guide you through the maze. By the end of this journey, you’ll grasp not just the nuts and bolts but also why many homeowners prefer Trex composite fencing over traditional materials. As we embark on this adventure, we’ll meticulously select the appropriate instruments and strategize our approach to overcome prevalent obstacles directly.
We’re not just slapping together a temporary solution here; we’re crafting a durable creation that reflects your personal touch. From mapping out your fence line to installing those final panels for an outdoor space transformation—every step is covered.
The reward? A durable, low-maintenance fence that elevates your home’s curb appeal without breaking a sweat or the bank. Let’s get started.
Understanding the Basics of Composite Fencing
What Is Composite Fencing?
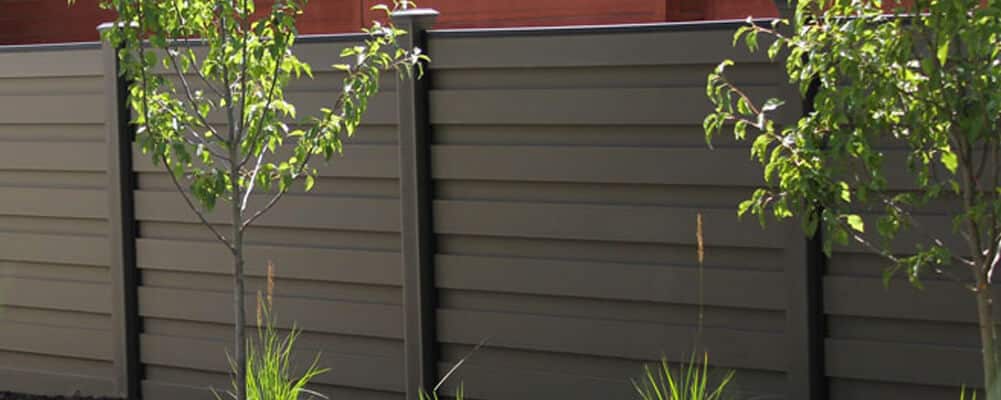
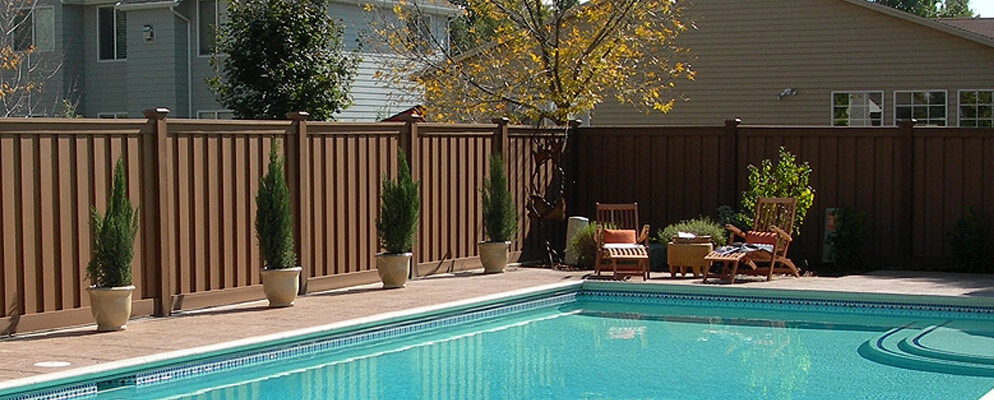
Opting for composite fencing allows individuals to enhance their backyard with a sustainable choice that cleverly combines aesthetics and practicality. Made from a blend of wood fibers and recycled plastics, it offers the best of both worlds – the natural look of wood without its maintenance headaches. Crafted from a blend that marries wood fibers with repurposed plastics, these panels boast an impressive resilience to the ravages of climate, invasive critters, and rot.
Beyond just being tough, choosing Trex composite fencing means you’re also making an environmentally responsible choice. Opting for this fencing style not only spruces up your outdoor space but also champions sustainability by diverting materials from overcrowding our landfills, thereby safeguarding Mother Earth’s treasures.
Opting for composite materials over the usual ones not only upgrades your backyard’s aesthetics but also champions sustainability, sidestepping the typical landfill destiny of traditional fencing resources.
If you’ve ever dealt with a wooden fence before, you know they require staining or painting every few years to keep them looking good—not to mention repairs from rot or insect damage. Metal options might skip the rot but can rust over time unless meticulously maintained. Enter composite fencing: it sidesteps all these issues with its robust design that doesn’t fade, stain, warp, or splinter.
Maintenance? Practically non-existent beyond occasional cleaning with soap and water—no more weekends spent on upkeep. Plus, let’s talk looks; composite fences come in various colors and styles designed to mimic real wood grain patterns closely. By integrating these, you instantly elevate the aesthetic charm of your home while enjoying a blend of resilience and straightforward upkeep.
For detailed instructions on achieving such solidity in your own yard—or if perhaps professional help seems more prudent given the project scope—our Trex Composite Fencing Professionals stand ready.
Planning Your Composite Fence Installation
Jumping into a DIY composite fence project without a plan is like baking a cake without a recipe. It might turn out okay, but why take the chance? Here’s how to map out your composite fencing journey for smooth sailing.
Mapping Out Your Fence Line
The first step in installing your dream fence is figuring out where it’s going to live. Grab some spray paint and start marking the ground where you envision those sturdy posts standing tall. But remember, accuracy is key here; an inch off can lead to headaches down the road. And speaking of roads, double-check local zoning laws because nobody wants their hard work dismantled due to being too close to property lines or violating height restrictions.
To avoid turning your yard into an abstract art piece with all that spray paint, use string tied between stakes for straight lines and curves as smooth as buttercream frosting on that metaphorical cake we’re not baking right now.
Calculating Materials with a Fencing Calculator
You wouldn’t throw random amounts of flour and sugar into your nonexistent cake, so don’t underestimate when it comes to materials for your fence. This is where our handy Composite fencing estimator becomes your new best friend by helping you nail down exactly what you need – from panels to posts – while also letting you play around with designs until everything feels just right.
A pro tip: always buy slightly more material than calculated. Why? Because mistakes happen — maybe you cut something wrong or change part of the design midway through installation — having extra means no panicked trips back to the store mid-project.
Digging Post Holes & Setting Up Foundation
We’ve mapped; we’ve calculated; now let’s get dirty. Start digging post holes at least 1/3 of the height of what will be above ground level for stability—think deep enough so they won’t dance away during bad weather conditions but not so deep they hit China.
Then pour cement into those freshly dug holes—it’s like giving each post its own concrete shoes (but in a good way). Cement helps prevent water entry which ensures longevity because nothing ruins Sunday BBQs faster than wobbly fences toppling over onto Aunt Marge’s potato salad.
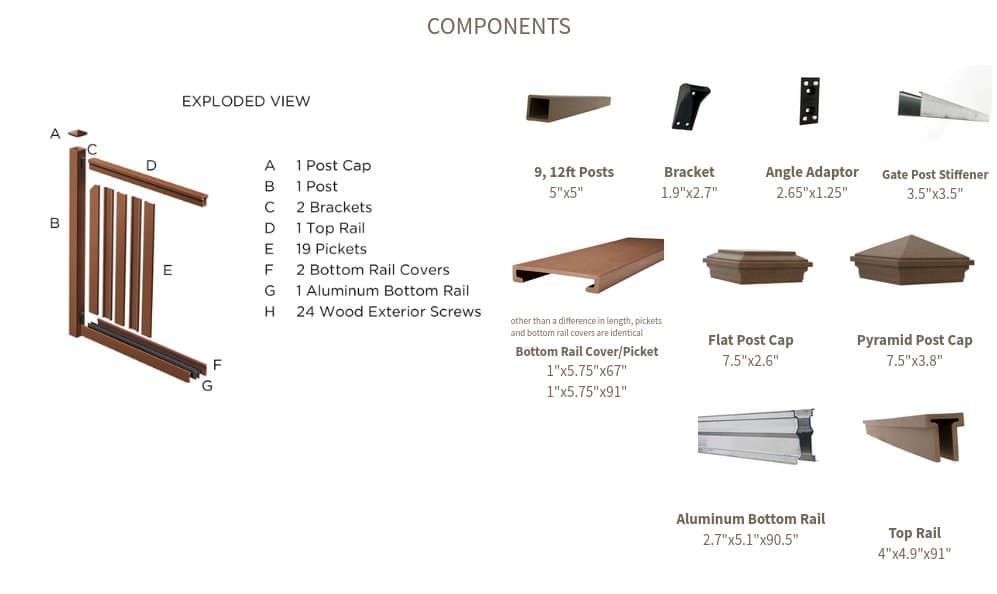
Essential Tools and Materials for Installation
Before you start digging into your backyard, make sure you have the right gear. The foundation of a sturdy composite fence begins with preparation and having the proper tools.
Digging Tool
A robust digging tool is non-negotiable. You’re not just planting flowers; you’re installing a fence that should withstand time and weather. Whether it’s a post-hole digger or an auger, choose one that makes sense for your soil type and physical ability to handle it. Remember, when setting up your posts, each hole needs to be at least 1/3 of the fence height deep for stability—this helps prevent water entry which can compromise your structure over time.
Filling these gaps with cement goes beyond mere stabilization; it plays a pivotal role in fostering a strong bond between the pole fixtures and the encircling terrain. In moisture-rich or wind-swept regions, cement forms an essential foundation for stability.
Heavy-Duty Screws
No matter how strong your panels are, they’re only as reliable as what holds them together. Heavy-duty screws ensure that once installed, those panels aren’t going anywhere unless you decide otherwise. This small detail can mean the difference between redoing sections every few years versus enjoying decades of security from your fencing investment.
Excess Materials: Plan Ahead.
We’ve all heard “measure twice, cut once,” but let me add—buy extra. Having excess materials on hand minimizes mid-project store runs (and headaches). From additional boards due to miscalculation or damage during installation to spare screws because dropping them happens more often than we’d like to admit—the peace brought by preparedness cannot be overstated. Additionally, getting free samples before finalizing decisions, a seemingly minor step, allows hands-on comparison among options ensuring satisfaction with texture color match-ups without committing fully initially.
Installing Composite Fence Posts
Digging post holes is the first step in creating a stable foundation for your composite fence. But before you start digging, grab some spray paint to mark out exactly where those posts will go. Marking the ground with spray paint is a crucial precursor to ensure every post stands in precise harmony along your envisioned boundary.
To get things right, remember that each hole should be at least 1/3 of the height of your future fence. For instance, if you’re aiming for a six-foot-tall privacy barrier, dig holes two feet deep. This depth provides the stability needed to keep your fencing upright through all seasons.
Avoid Common Pitfalls During Installation
No matter how carefully we plan or execute these steps toward installing our dream composite fences—we’re bound to encounter hiccups along the way. Perhaps the most common challenge faced during the process involves achieving perfect alignment across the entire length. To combat this issue, consider using string lines as guides while setting up panels between freshly installed poles—they serve as great visual aids keeping everything straight aligned throughout the project duration. And don’t forget patience is a key ingredient to any successful DIY home improvement endeavor.
Setting Up Composite Fence Panels
Installing composite fence panels between posts ensures a stable and visually appealing barrier. This process might seem daunting, but with the right approach, it’s straightforward.
Preparation is Key
To kick things off, make sure you have all your materials ready. You’ll need heavy-duty screws specifically designed for outdoor use to secure the panels firmly in place. Having everything on hand before you start digging post holes or setting corners can save time and prevent headaches later.
A crucial step is planning where each panel will go. Use spray paint to mark the ground where each post will be installed. By employing a visual map, we guarantee the precise placement and harmony of each component throughout the setup process.
Digging post holes correctly is essential for a strong foundation. Aim to dig each hole at least 1/3 of your fence height deep; this ratio provides stability against wind and other forces of nature.
The Installation Process
With your posts securely in place (and after ensuring they’re level), it’s time to attach the composite fencing panels. Start by setting corners first; these act as anchors that define the perimeter of your fencing project.
Lay out the panels flat on the ground between two posts to get an idea of alignment before lifting them into position. Once satisfied with their placement, use those heavy-duty screws mentioned earlier to affix each panel tightly against its supporting posts—this prevents any unwanted gaps or wobbling once everything settles in place.
Contact one of our Trex Composite Fencing Professionals for additional advice on getting professional help when needed.
Troubleshooting Tips
Ensuring straight lines across long stretches can be challenging without proper guidance tools like string lines or levels.
Consider using spacers between boards if uniformity in spacing is critical for aesthetic reasons.
Don’t forget about the clearance below. Leaving just enough space under fences helps prevent water damage by allowing rainwater runoff—an important consideration given how pooling moisture could potentially compromise material integrity over time.
By integrating curved channels and other decorative features, the process becomes simpler without sacrificing effectiveness—showcasing the seamless blend of straightforward installation methods with sophisticated product engineering to streamline intricate tasks.
Troubleshooting Common Installation Challenges
So, you decided to upgrade your yard with a sleek composite fence but hit a few snags along the way? Don’t worry; even the most seasoned DIYers encounter hiccups. Here’s how to tackle some common challenges head-on, ensuring your fence is not only straight and sturdy but also boasts that professional finish.
Keeping Your Fence Straight
Fencing might seem straightforward until you’re trying to keep 100 feet of it arrow-straight. The key here is starting right by marking out your line meticulously. Use spray paint or stakes and string to map it out clearly before you start digging those post holes. Employing a laser level during this phase can drastically enhance your accuracy, akin to having the sharp focus of a marksman over extended spans.
Once posts are in place—dig at least one-third of the fence height for stability—double-check alignment before setting them in concrete. Pouring cement into these holes not only secures them but also helps prevent water entry which could compromise their grip over time.
Achieving Proper Clearance
No one wants their brand-new composite panels rubbing against the ground or leaving too much space underneath—it’s like wearing pants either too long or short: uncomfortable either way. To avoid this fashion faux pas with your fence, measure twice and cut once applies profoundly here.
During installation, maintain a consistent gap between panels and earth (or existing concrete if attached there). This spacing isn’t just about aesthetics; it allows rainwater runoff and prevents debris buildup—which means less cleaning for you.
If integrating panels between existing concrete posts proves tricky due to size mismatches, don’t despair. Adapters exist precisely for such predicaments, allowing secure attachment without having to redo all supports from scratch—a lifesaver when working with pre-existing structures.
Sometimes issues arise after everything seems done—for instance noticing slight deviations making things look off-kilter. Fear not. Adjustments can often be made by loosening screws on panel attachments slightly and then realigning them before tightening them back up; sometimes small tweaks make big differences.
Last piece of advice? Patience truly is a virtue during any construction project especially fencing where each section builds upon the accuracy of previous ones. When doubt creeps in, remember help’s always available whether through Trex Composite Fencing Professionals ready to assist whenever needed, or online resources chock-full of additional tips.
Maintaining Your New Composite Fence
Once you’ve completed the journey of installing your new composite fence, it’s time to talk about keeping it looking as good as day one. Despite its ease of upkeep, composite fencing still requires a bit of tender loving care to stay pristine; let’s explore how you can achieve this with just a few simple steps.
Regular Maintenance Is Key
The secret sauce to a long-lasting composite fence is regular upkeep. Although it doesn’t require staining or painting like wood does, giving your fence a little TLC goes a long way. A simple rinse with water can remove most dirt and debris. For tougher stains, a soft cloth and mild soap solution are all you need to keep panels shining.
Another pro tip? Check for any loose screws after extreme weather conditions or at least twice a year. This quick checkup helps prevent bigger issues down the road.
Enjoying Long-Term Benefits
Maintaining your Trex fencing is crucial for preserving both its appearance and the long-term functionality of your outdoor living space. By consistently following these simple care routines throughout each season and over the years, you can avoid costly repairs and ensure your investment lasts for decades. Taking proactive steps now will save you from future hassle and expenses. This article provides valuable guidance for homeowners like you, offering detailed instructions on every aspect of fence maintenance, from initial planning to ongoing care. By reading and implementing the advice provided here, you can take pride in a beautifully maintained fence that enhances your property for years to come.
Taking care of your Trex fencing is more than a chore. It’s an investment in protecting and enhancing the value of your home. Adhere to the guidance provided, explore our website for additional insights, and feel free to inquire if you’re puzzled. Your fence is not just a boundary; it’s an investment into the beauty and function of your outdoor space that deserves attention.
Getting Professional Help When Needed
Even the most enthusiastic DIYer hits a wall sometimes—literally if you’re not careful while installing fence posts. This is where knowing when to wave the white flag and call in Trex Composite Fencing Professionals becomes crucial. Trust me, there’s no shame in it; we’ve all been there.
Digging post holes deeper than one-third of your fence height seems straightforward until you hit rock-hard soil or, worse, utility lines (hello, unexpected project halt). And pouring cement into those holes? It needs precision to prevent water entry and ensure that each post sticks as it should. These are moments when having an expert on speed dial doesn’t just sound smart; it feels downright necessary.
The beauty of composite fencing is its simplicity—but don’t let that fool you into thinking every step will be a breeze. Setting up panels requires more than heavy-duty screws and a good eye for alignment. Ensuring proper clearance from the ground to avoid moisture damage or improper slope adjustment can quickly turn your dream fence project into a logistical nightmare without professional insight.
Troubleshooting Common Installation Challenges
Here’s where things get sticky—literally and figuratively speaking—if you’re doing this solo: keeping that darned fence straight as an arrow during installation. You might think spray paint markings are enough until uneven terrain says otherwise. Then there’s achieving perfect set corners amidst all this chaos; fun times indeed.
Add onto these challenges factors like existing concrete posts from an old wooden fence begging for repurposing with some fancy new composite panels—or integrating decorative elements without compromising stability—and suddenly “simple” turns complex faster than you can say “Trex”. That curveball alone makes seeking professional advice seem less luxurious and more lifeline.
Maintaining your newly installed masterpiece also demands ongoing attention but fear not. Regular upkeep ensures longevity—a minor trade-off for such grandeur at your doorstep. Contacting our Trex Composite Fencing Professionals provides peace of mind beyond initial install woes because hey—they’ve seen (and fixed) it all before.
Diving Deeper Into DIY – Advanced Customization Tips
When you’re ready to take your composite fencing project up a notch, diving into the realm of customization can transform your outdoor space from standard to standout. Tweaking your composite barrier not only enhances its appearance but also ensures it meets both the visual and practical needs of your domicile.
Choosing Your Style and Color
The first step in customizing is deciding on style and color. With Trex’s range of options, picking something that complements your house while standing out is easy. Whether it’s sleek greys for a modern look or warm browns that mimic natural wood, selecting the right shade makes all the difference.
Beyond colors, incorporating various designs like horizontal or vertical panels adds character. Experimenting with panel spacing allows for unique patterns that can make your property pop.
Incorporating Decorative Elements
Next-level customization involves adding decorative elements. This could mean integrating latticework at the top for climbing plants or using lighting fixtures within posts for ambiance and security after dark. Such features not only enhance beauty but also functionality, creating an inviting atmosphere around the clock.
An interesting tip here: use heavy-duty screws when attaching any additional decor to ensure longevity and stability against weather conditions.
Making Use Of Existing Features
If you have existing concrete posts or bases in place from an old fence setup, don’t rush to remove them. You might find these pre-existing structures handy as supports for new sections – saving time and effort during the installation process. There are adapters available specifically designed to let composite materials adhere securely onto concrete surfaces without compromising on durability. Discover how to effortlessly set up Trex’s composite barriers atop pre-existing concrete bases on this page.
Getting Started With Your Project – Downloadable Resources
If you’re eyeing a DIY composite fence project, grabbing the right resources is like finding a treasure map—it leads you straight to success. Here’s why our downloadable guides and simple installation instructions are gold for beginners and seasoned builders alike.
Simple Installation Instructions
Embarking on a fresh endeavor often resembles finding one’s way through an intricate labyrinth. That’s where our simple installation instructions come in handy. They break down each step of installing your Trex fencing SRF, from mapping out your fence line to the final touches, ensuring nothing feels like rocket science.
To start digging with confidence, it’s crucial to understand how much material you’ll need—something these guides cover extensively. They also touch on using spray paint for marking areas efficiently and safely before any dirt is moved. Remember: Digging post holes at least 1/3 of the fence height not only promises stability but also wards off water entry nightmares.
Installation Guides
Dreaming about those perfect composite fencing panels fitting snugly between posts? Diving into our thorough installation manuals, you’ll uncover the secrets to transforming your vision into tangible beauty, selecting robust screws for a seamless fit and angling corners with precision.
The beauty of these guides lies in their ability to simplify complex processes such as pouring cement correctly or preventing water damage—a common concern among DIY enthusiasts. By illustrating techniques clearly, they ensure your newly installed fence stands strong against whatever nature throws its way while looking effortlessly chic.
Diving Deeper Into DIY – Advanced Customization Tips
Beyond just getting your feet wet with basic installations, we’ve included some nuggets on customizing your composite fence for an added personal touch in our advanced sections.
These include ideas on integrating outdoor space enhancements seamlessly with your new barrier or even adding unique elements like curved channels without compromising structural integrity.
Thus, if your heart yearns for more than mere utility and desires a sprinkle of elegance in your garden retreat, delve into these extra tips tailored to help you create something genuinely extraordinary.
Conclusion
You’ve taken the plunge into composite fencing, it seems. Now, knowing how to install a composite fence seems less daunting and more like an achievable weekend project.
Start by planning. Start with precision in mapping out your fence line and calculating the materials needed. This ensures no surprises on costs or shortages mid-project.
Remember the importance of proper installation—from digging post holes deep enough for stability to securing panels with heavy-duty screws for durability.
Maintenance is minimal but don’t neglect it. A quick check now and then keeps your fence looking new for years.
If challenges arise, remember help is just a call away to professionals ready to assist.
Your outdoor space transformation awaits. With these steps in mind, installing that beautiful, long-lasting composite fence is not just possible—it’s within reach.
Need more help? Contact Trex Fencing SRF today.


